Landing Zone File Transfer
This section describes how you can upload, validate and transfer files into the project sample repository using landing zones.
Uploading Your Files
Uploading files is permitted to users with the project contributor access level
or higher. If you have created your zone
and it is visible in the zone list with
the status of ACTIVE, you can proceed with uploading data into your landing
zone.

Landing zone with ACTIVE status
You will need iRODS access and a personalized SODAR iRODS environment file to upload your files into the landing zone. For instructions on the use of iRODS with SODAR, see the iRODS access documentation as well as the iRODS manual.
The actual uploads can be performed in a variety of ways from manual uploads using iCommands to specific file ingestion scripts. Please consult the conventions of your project and team.
Regardless of the upload method, SODAR expects the uploaded data to follow certain conventions:
Scope of Landing Zones
In the current implementation, all data is uploaded on the assay level. A single landing zone is always linked to an assay and should contain files specific to that assay. Study level data repositories and related landing zones may be implemented in a later SODAR release.
File Checksums
SODAR requires for a checksum file to accompany each file when uploaded to the
server. This file is used to verify the original checksum against the one
calculated in iRODS once the upload is complete. The file should be named with a
suffix representing the hashing scheme used, following the name of the actual
data file. For example, with the default hashing scheme MD5, a file named
filename.bam must be uploaded together with a checksum file called
filename.bam.md5 in the same collection.
iRODS checksums not present after the upload are automatically calculated prior
to validating the landing zone. This means uploading with the -k argument or
separately calling ichksum are not required. The calculation step may take
some time with large landing zones.
Note
SODAR supports MD5 and SHA256 hashing schemes. Administrators can
set the server to support one of these schemes on initial deployment.
MD5 is the default setting. For more information, see
iRODS Checksum Hashing Support.
Collection Structure
SODAR enforces a certain root collection structure for assay data, which must also be followed within the landing zone. If the Create Collections option is set true when creating the zone, these expected collections are created automatically. If collections are left empty in the landing zone, they will not be created in the sample repository.
If the Restrict Collections option is unset, SODAR allows uploading data into root level collections other than the expected ones. However, these will not be visible in the Sample Sheets user interface. Thus, this is not recommended.
There are three common root level collections for all assays:
MiscFilesMiscellaneous assay specific files not belonging under any other collection.
ResultsReportsResult and reports files related to the assay.
TrackHubsUCSC Genome Browser track hubs. For more information see iRODS Access Tickets.
Other collections expected for a specific landing zone depend on the assay configuration. For detailed reference on which assay type expects which collections, see Advanced Metadata Topics.
Prohibited File Types
Project owner or delegate may prohibit the uploading of certain files by file suffix. The user is notified of a possible restriction in the zone list and create view UI. This limitation is project specific.
If prohibited file types are uploaded, landing zone validation and moving will fail with an error message listing the offending files. Removing those files and associated checksum files will allow you to validate and move your landing zone.

Prohibited files alert
Replacing Files
In the current implementation, overwriting existing files is not allowed. Upon attempting to upload a file into a collection where an identical file name already exists, the operation will roll back with a failure.
Hint
If an existing file needs to be updated or replaced, either upload the new version with a different name or request for the deletion of the original file.
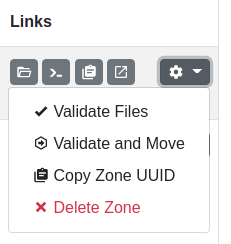
Validating Files
To ensure your uploaded files are OK for being transferred into the project sample data, you can call on SODAR to validate them. To do this in the Landing Zones UI, open the dropdown next to your landing zone in the zone list and select Validate Files.
Attention
Administrators of your SODAR instance may limit the amount of simultaneous validation processes per project. If this limit is reached, ongoing validation jobs must finish before new ones can be initiated. The UI and REST API will inform you of the limit being reached.
Landing zone dropdown
Selecting Validate Files will start the validation process for the given zone in the background. In the validation phase, SODAR checks for expected files and compares iRODS checksums to corresponding checksum files. If checksums were not calculated in iRODS during file transfer, they will be generated automatically by SODAR before comparison.
Duration of the validation process depends on the amount of files in your zone and whether checksums were calculated during transfer. You can monitor the status of the process in the landing zone list view. You will also receive an alert once validation is done.

Landing zone with VALIDATING status
If the validation was successful, your landing zone will return to the
ACTIVE status and restore your write access. You can then upload more files
or go ahead with moving your files into the read-only sample data repository.

Landing zone status after successful validation
If an error is encountered during validation, the landing zone status is set
to FAILED. The Status Info field in the landing zone list will contain
details of what failed. In most cases, these fall into the following categories:
File checksum does not match the accompanying checksum file.
An checksum file is missing.
An checksum file is present but the related file is missing.
The checksum file is somehow invalid.
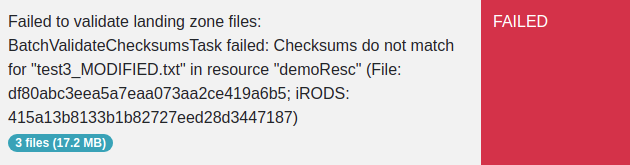
Landing zone status after failed validation
If there have been problems with multiple files, all the errors are detailed sequentially in the zone status info. At this point you can go back to fix the problems with your files and retry validation again.
Moving Files
Once you have finished uploading files into your landing zone and wish to transfer the files into the read-only sample data repository, you should open the dropdown next to your landing zones and select Validate and Move. This will trigger the validation process as described above and if successful, automatically proceed to move the files under the assay. As with validation this is done in the background and you can monitor the process in the landing zone list.
Attention
Only one moving process per project can be active at a given time. The UI will display a locked status and disable relevant controls if the project is currently locked for moving operations.
Hint
If it is enabled on the SODAR server, it is also possible to trigger moving
of files by creating an empty file with a specific name under your landing
zone. By default, this file is called .sodar_validate_and_move. If you
wish to use this feature and are unsure of how the server is configured,
contact the server administrators for further information.
If successful, the status of your landing zone will be updated to MOVED,
with the count of moved files excluding the checksum files. Cache update for
sample sheets is also initiated to ensure iRODS links are up-to-date in the UI.
You can then navigate to the Sample Sheets app
to view your files in the assay.

Landing zone with MOVED status
You will also receive an alert for the successful moving operation.
The landing zone is deleted after successfully moving files. The next time you view the zone list, it will no longer be displayed. To upload more files at a later time, you must create a new zone.
In case of a failure, the landing zone status is set to FAILED along with a
description of the encountered error. The operation is rolled back, with the
files returned to your landing zone and write access enabled. Similar to
validation errors, you can then fix the reported error and retry the moving
operation.
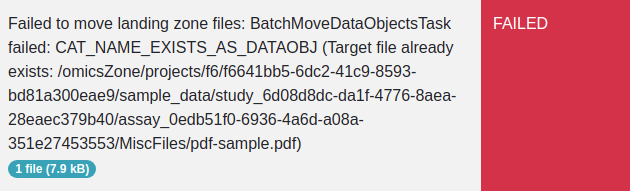
Landing zone status after failed moving
Hint
The exact list of files transferred from a landing zone to the sample data repository can be reviewed in the “extra data” modal for the related Landing Zone Move Timeline event. This information is currently available for project owners and delegates.
Zone Move Verification
If enabled on your SODAR instance by administrators, the files may still be verified after a successful landing zone move. This is done to double check file integrity once the data has been moved to their permanent storage position. This happens silently in the background and the results can be seen in the project timeline as a Zone Verify event. You can access your files while verification is running.
In the unlikely situation an issue is detected with the files, you will receive a UI alert and/or an email. This depends on how landing zone alerts have been have configured in your user profile.
Landing Zone Deletion
You can delete any of your landing zones by clicking Delete Zone in the landing zone dropdown. After a confirmation dialogue, the landing zone along with all associated files in iRODS will be deleted.
Warning
Deleting a landing zone can not be undone!
Hint
As with landing zone moving, the list of files deleted along with the landing zone can be seen in the “extra data” modal for the related timeline event. This information is currently available for project owners and delegates.
Landing Zone Reset
In some cases, issues in the server environment or network may cause the landing
zone to get stuck in a busy state. In such a case, the zone state can be reset
by an administrator. This will reset landing zone iRODS user access back to its
owner and the project owner group, as well as set its status as ACTIVE,
making the zone available for further actions.
This can be done from the zone dropdown in the SODAR UI under Reset Zone. Alternatively, the following management command can be used:
$ ./manage.py resetzone -z {ZONE_UUID}
As these actions require administrator access, you should contact the admins of your SODAR instance to request a reset.